As we get closer to Turkey Day, you are probably starting to plan the finer details. Hopefully you’re planning to fry your turkey in Bacon Up Bacon Grease, which promises to add a delicious depth of flavor versus roasted turkeys or birds fried in other cooking oils.

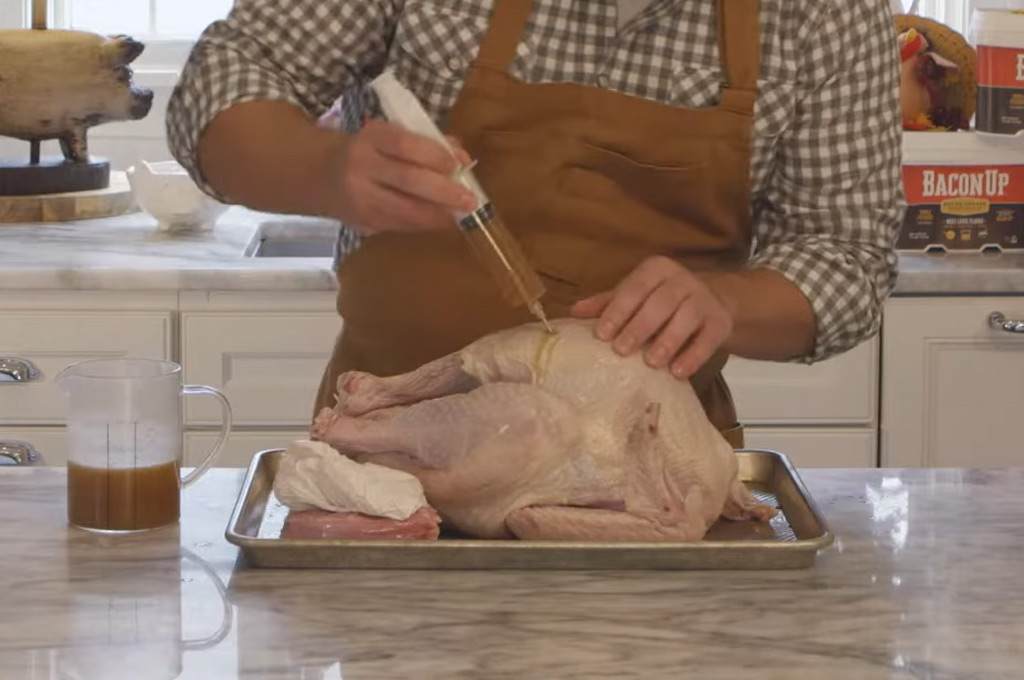
If you’re wondering what else you can do to make the meat even juicier and more flavorful, we’ve got some injection recipes for you to consider, along with a few favorite spices and rubs you may want to use to jazz up the crispy skin even more.

Injection Recipes (Injectable Marinades)

Whether it’s the night before (ideal!) or even just 20 minutes before frying, you can add moisture and flavor to your turkey fry with an injection recipe. And an injectable marinade with Bacon Up will take it to the next level, of course! If you have the time to “inject-from-scratch,” we’re happy to share some of our family’s recipes for you to consider. You can find them on the Recipes & Tips section of our website, or click below to go straight to each recipe:

  • The “FAMILY FAVE” injection features Italian salad dressing and Tony Chachere’s® Original Creole Seasoning
  • The “KICKED-UP” injection features Worcestershire sauce and hot sauce
  • The “SAVORY” injection features red wine vinegar and soy sauce

Although we usually make our own injection recipes incorporating the next-level flavor of Bacon Up Bacon Grease, we will admit that there are also plenty of darn good store-bought injections out there. If you’re running a little short on time, don’t feel the slightest bit guilty – just pick up an injection kit at the store and check that off your list. A couple of our favorites are:

Rubs & Spices

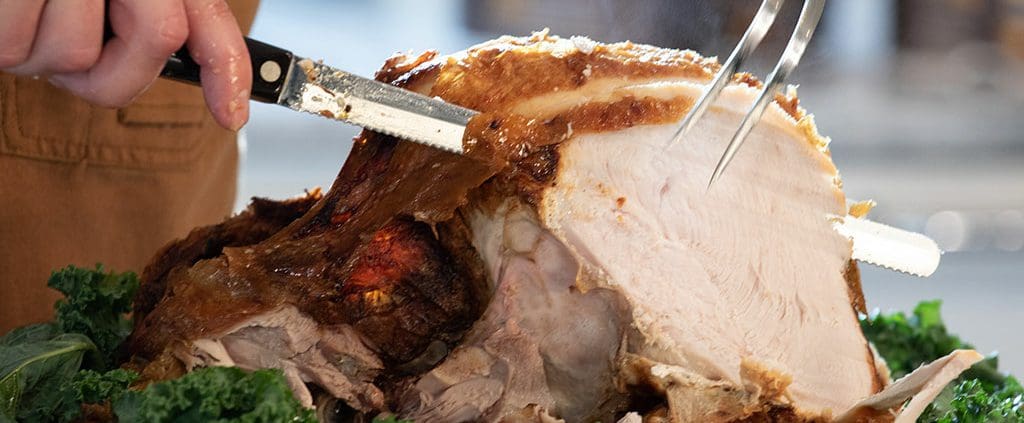
And lastly, if you think that raw turkey looks a little too pasty white to be delicious, here are a few spices and/or rubs that you might enjoy sprinkled and patted onto your bird before he goes into the fryer:

Share your Success!

If you try one of our injection recipes, let us know how it goes! Or, if you find another recipe or commercial brand that you liked, we’d love to hear about that, too. Either way, just drop us a line (and send a picture, too!) so we can share it with others.

However you do it, our Bacon Up family wishes you a fun and flavor-filled day with family and friends!!


Recipes

Savory Bacon Up Bacon Grease Turkey Injection

Main Course
American
Thanksgiving, Turkey fry, Turkey Injection
Whether it's the night before (ideal!) or even just 20 minutes before frying, you can add moisture and flavor to your turkey fry with an injection recipe. And adding Bacon Up will take it to the next level, of course!
This "SAVORY" injection features red wine vinegar and soy sauce.

Equipment

  • 1 Sauce pan
  • 1 Meat injection syringe

Ingredients

  • 3/4 cup butter 1.5 sticks
  • 1/2 cup Bacon Up Bacon Grease
  • 1/4 cup red wine vinegar
  • 1/4 cup soy sauce lower sodium version works fine
  • 1/2 tbsp lemon juice to taste
  • 2 tsp seasoned pepper
  • 1/2 tsp garlic powder
  • 1/2 tsp celery salt

Instructions

  • In a sauce pan, heat butter and Bacon Up until melted. Stir in the other sauces and seasonings. Turn off heat and allow to cool until injection fluid can be safely handled.
  • Using a meat injection syringe, insert about 2 tablespoons at a time directly into evenly distributed spots around the breast and white meat sections of the turkey. Be sure the turkey is completely thawed first and also be sure to get the needle all the way into the meat, not just under the skin. (Don’t worry too much about the legs and dark meat – they generally have enough fat and flavor to stand on their own.)
Print Recipe


Recipes

Kicked-up Bacon Up Bacon Grease Turkey Injection

Main Course
American
Thanksgiving, Turkey, Turkey fry, Turkey Injection
Whether it’s the night before (ideal!) or even just 20 minutes before frying, you can add moisture and flavor to your turkey fry with an injection recipe. And adding Bacon Up will take it to the next level, of course!
This “KICKED-UP” injection features Worcestershire and hot sauce.

Equipment

  • 1 Sauce pan
  • 1 Meat injection syringe

Ingredients

  • 2 Sticks of Butter 1 cup
  • 3/4 cup Bacon Up Bacon Grease
  • 1 tablespoon Worcestershire sauce
  • 1-2 teaspoons hot sauce to taste
  • 2 tablespoons salt
  • 1 tablespoon black pepper
  • 1/2 teaspoon red pepper
  • 1/2 teaspoon white pepper
  • Cayenne pepper to taste a dash or two, for us

Instructions

  • In a sauce pan, heat butter and Bacon Up until melted. Stir in the other sauces and seasonings. Turn off heat and allow to cool until injection fluid can be safely handled.
  • Using a meat injection syringe, insert about 2 tablespoons at a time directly into evenly distributed spots around the breast and white meat sections of the turkey. Be sure the turkey is completely thawed first and also be sure to get the needle all the way into the meat, not just under the skin. (Don’t worry too much about the legs and dark meat – they generally have enough fat and flavor to stand on their own.)
     
Print Recipe


Recipes

Family Fave Bacon Up Bacon Grease Turkey Injection

Main Course
American
Thanksgiving, Turkey, Turkey fry, Turkey Injection
Whether it’s the night before (ideal!) or even just 20 minutes before frying, you can add moisture and flavor to your turkey fry with an injection recipe. And adding Bacon Up will take it to the next level, of course!
This “FAMILY FAVE” injection features Italian dressing and Tony Chachere's® Original Creole Seasoning.

Equipment

  • Sauce pan
  • Meat injection syringe

Ingredients

  • 2 Sticks Butter 1 cup
  • ¾ cup Bacon Up Bacon Grease
  • ¾ cup Italian salad dressing
  • Tabasco to taste we use 1-2 teaspoons
  • 1-2 tbsp Tony Chachere’s® Original Creole Seasoning

Instructions

  • In a sauce pan, heat butter and Bacon Up until melted. Stir in the other ingredients. Turn off heat and allow to cool until injection fluid can be safely handled.
  • Using a meat injection syringe, insert about 2 tablespoons at a time directly into evenly distributed spots around the breast and white meat sections of the turkey. Be sure the turkey is completely thawed first and also be sure to get the needle all the way into the meat, not just under the skin. (Don’t worry too much about the legs and dark meat – they generally have enough fat and flavor to stand on their own.)
Print Recipe

Bacon Up Turkey Fry

A How-To Video & Guide

Jump to Recipe

Would you like to put a new twist on your Thanksgiving traditions?

We can help!! This year, fry your turkey in Bacon Up Bacon Grease.

The whole experience is a delight! Seeing and hearing the golden oil bubbling will start the excitement and the yummy bacon aroma will keep the anticipation building. And when it’s done, you’ll love the crispy texture and juicy meat and, of course, the tasty hint of bacon flavor. It doesn’t overwhelm the turkey, but adds a depth of flavor that will really take your turkey to the next-level. If your family is like ours, you’ll never go back!

Watch Chef Zach to see how it’s done and use the handy how-to guide below to plan your own Bacon Up Turkey Fry:

First Things First

  • Remove the wire, plastic straps, and anything else holding the legs in place, any gizzards (or parts) that may be in the cavity, and the plastic pop-up thermometer that comes with the turkey.
  • Be sure your turkey is COMPLETELY THAWED. If a frozen turkey – even partially frozen – hits hot oil, it can be disastrous. Put your bird in the fridge for a day or two and if you still sense icy pockets, give it a bath in luke warm water.
  • The night before is the perfect time to add some juicy flavor right into the meat with an injection recipe. Make sure you’re getting it directly into the meat, not just under the skin. Massage it in a little, and then put the turkey back in the refrigerator to soak it up.
  • Remove the turkey from the refrigerator at least 30 minutes – and up to two hours — before cooking. Make sure the turkey is 100% DRY.  **Again, OIL + WATER = DISASTER.** Stay safe and don’t take the risk.

Getting Set

  • You’ll likely need between three to four buckets of Bacon Up Bacon Grease to completely cover an average sized turkey. If your turkey is a bit larger or smaller than normal, you can adjust the amount of bacon grease accordingly.
  • The bacon grease will expand as it heats up, so make sure your pot is large enough to account for the rising level of bubbling grease once the turkey is dropped in. Safety first! You don’t want the grease to flow over the top of your pot. A 30 quart pot easily holds a 12 pound turkey.
  • Make sure you have a fryer thermometer that hooks onto the side of the pot. Monitoring the temperature throughout the process is really, really important!
  • Fry the turkey in an open area outdoors. Do not fry the turkey in your garage, kitchen, or covered patio. Keep the fryer away from pets, children, and any flammable structures.
  • Never leave the fryer unattended. Curious children and pets could get burned by the hot grease.

Let’s Get To It

  • We recommend frying the turkey at 350 °F. NEVER let the temperature of the grease rise to over 400 °F. If it accidentally rises past 400 °F, turn off the heat immediately and allow the grease to cool off again. NEVER drop ice into the hot grease to cool it down. Let it cool naturally.
  • Make sure you’re wearing some type of oven mitt or glove to handle the pot. If the grease pops, you don’t want it to burn your hand. Eye protection, long pants, and old shoes are good ideas, too.
  • Before you drop the turkey in, TURN OFF THE BURNER! Be sure the bird is dried off, then slowly lower it into hot grease. Then remember to turn the gas back on! You’d be surprised how many people forget in the excitement of the moment. Introducing the cool turkey will probably drop the temperature of the grease, so give it enough gas to get the temperature back up to the ideal 350 °F.
  • Once your Bacon Up turkey fry is underway, keep an eye on the temperature and make sure it stays stable at 350 °F. And to reiterate, never leave the fryer unattended and be sure kids and pets stay clear.
  • A good rule of thumb is to cook your turkey for 2-1/2 to 3 minutes per pound. So, a 12 pound turkey will take about 35 minutes. The best way to test if the turkey is done is to insert a meat thermometer into several parts of the turkey. The turkey is done when the internal temperature is 165°-180°F.
  • We know you’ll be excited to taste your Bacon Up turkey, but remember to turn off the heat before removing the turkey from the pot. And let all the oil drain out over the pot before moving it to your pan or platter.
  • Obviously, your turkey will be piping hot, so let it rest several minutes before carving into your masterpiece. And if you’re waiting for some other dishes to finish (and have room in your oven!), you can keep it warm at 180° until everything else catches up.

Enjoy!

When all is said and done, we think you’ll agree that a turkey fried in Bacon Up is unsurpassed in terms of moist meat and delicious flavor.

Print

Bacon Up Turkey Fry

Would you like to put a new twist on your Thanksgiving traditions?
We can help!! This year, fry your turkey in Bacon Up Bacon Grease.
Course Main Course
Cuisine American
Keyword Thanksgiving, Turkey fry
Prep Time 1 hour
Cook Time 35 minutes
Total Time 1 hour 35 minutes

Equipment

  • gas fryer
  • large frying pot a 30 quart pot can easily hold a 12 pound turkey
  • spindle for lowering & removing turkey
  • frying thermometer
  • meat thermometer
  • oven mits or heat-resistant gloves for handling the pot
  • eye protection e.g. goggles or safety glasses
  • long pants
  • old shoes
  • wide open outdoor area

Ingredients

  • 3-4 pounds Bacon Up Bacon Grease
  • 1 twelve (12) pound turkey

Instructions

Safety First!

  • You MUST ensure that the turkey has THAWED and DRIED COMPLETELY before placing it in the oil. Water + Oil = Disaster!
  • DO NOT fry the turkey in your kitchen, garage, or under a covered patio. Keep fryer away from pets, children, and any flammable structures.
  • NEVER leave the fryer unattended. Curious children and pets could get burned by the hot grease.

Preparing the Turkey

  • If frozen, put your bird in the fridge for a couple of days (typically 1-2) beforehand until it has completely thawed.
  • Remove the wire, plastic straps, and anything else holding the legs in place, any gizzards (or parts) that may be in the cavity, and the plastic pop-up thermometer that comes with the turkey.
  • The night before or up to 20 minutes ahead of the turkey fry, add your spice rubs and/or inject your marinade into the turkey.
  • Remove the turkey from the refrigerator for at least 30 minutes and up to two hours before cooking to ensure it has dried completely.
  • To ensure even cooking in the fryer, tuck the wings underneath the front of the bird, and tuck the legs into where the tail used to be.

Preparing the Fryer

  • Set up your fryer in an open outdoor area, well away from any buildings, flammable structures, pets, and children.
  • Add 3-4 pounds of Bacon Up Bacon Grease to the fryer pot. Warming the bacon grease to about 80 degrees, or until it is the consistency of applesauce, can make it easier to pour into the pot.
  • Place the pot with the grease on the fryer. Turn on the gas, place your lighter near the ignition source, and slowly turn the regulator until you hear the fryer ignite.
  • Wait about 15-20 minutes until the grease has reached 350°-370° F.

Frying the Turkey

  • Slide the turkey onto the spindle/spit and TURN OFF your heat source before slowly dunking the turkey into the pot.
  • Once the bird is fully submerged, reignite the fryer and maintain a temperature of 350° F. DO NOT allow the grease to go above 400°.
  • A good rule of thumb is to cook your turkey for 2-1/2 to 3 minutes per pound. So, a 12 pound turkey will take about 35 minutes.
  • Once the turkey has finished cooking, be sure to turn the heat off BEFORE removing it from the pot. Allow all of the oil to drain out over the pot before moving it to a pan or platter.
  • The best way to test if the turkey is done is to insert a meat thermometer into several parts of the turkey. The turkey is done when the internal temperature is 165°-180°F.
  • Let the turkey rest for several minutes before carving. You can keep it warm in the oven at 180° F if needed.
  • Carve into your masterpiece and enjoy!

We hope you’ll decide to fry your bird in Bacon Up this year — we know you’ll love the moist, tasty turkey that results!

But PLEASE – be safe doing it. We’ve been frying turkeys since 1987 when we welded together a burner that could hold a pot big enough for a turkey, and we’ve put together some safety tips based on things we’ve learned along the way:

Begin with the Bird

  • Smaller turkeys are safer to fry. Birds in the 8-10 pound range are best and we recommend that you do not exceed 12 pounds. If you have a big crowd and need more meat, then do two! At 3 minutes a pound, a 10-pound turkey will be done in 30 minutes and you can keep it warm in a 180° oven while you fry the second one.
  • Be sure the turkey is COMPLETELY thawed! Start early in the fridge and if you suspect there may still be pockets of ice anywhere internally, soaking in warm water may be helpful.
  • Then dry like the dickens!! Water and oil are a dangerous combination, so dry your bird thoroughly to prevent flare-ups and flames. Our family likes to take the turkey out of the refrigerator two hours before to help it dry out. And when you’re drying it off, don’t forget to dry under the flaps and in all the little pockets!
  • Be sure the internal cavity is empty! Remember to remove all the turkey innards, skip the stuffing (at least in the bird!) and do not prep your turkey with water-based marinades. Your safety depends on a clean, thawed, dry turkey.

Check list: Stock up on Supplies with Safety in Mind

  • THERMOMETER – You’ll need a thermometer and a clamp that holds it onto the top of the pot – or a fryer that comes with a built-in thermometer/temperature control gauge.
  • FIRE EXTINGUISHER – Be sure to have a grease-rated fire extinguisher on hand. It should be a medium-sized ABC dry chemical extinguisher. And remember – NO Water! NO Garden Hose! Ever!!
  • METAL LID – Have a metal lid handy that will completely cover your fryer pot. This is a quick way to smother flames and kill a fire, if you catch it while it’s small. If your fryer did not come with a lid, a flat baking sheet will also work, if it’s large enough to cover the entire pot.
  • OVEN MITTS or GLOVES – Protect yourself with oven mitts or flame-proof, protective gloves that will cover your wrist and forearm. Note: Welders’ gloves work very well!
  • GOGGLES or SAFETY GLASSES – Protect your eyes from bubbling oil that may jump the pot and reach your face.
  • SIDE TABLE – Set up a table to hold all of the above safety equipment, as well as the other frying equipment you’ll use.
  • PROPER CLOTHING – Long pants, old shoes, and an apron are also suggested.

Setting the Scene for Safety

  • It’s obvious, I know, but you’d be surprised how many people don’t follow this one – Outdoor fryers MUST BE USED OUTDOORS! And this does NOT mean the garage, under a covered porch, or next to the house!
  • Find a level, fire-proof surface away from the house/garage, trees, bushes, overhangs, fences, etc. And, no, the deck is not safe! A patio, driveway, or flat/level part of the yard away from the house, etc. will work.
  • Think it through and choose a safe spot wisely, because once you fire-up your fryer, do not move it! Let it cool completely before moving or cleaning up – a minimum of a couple hours, typically.
  • As you set everything up and prepare to fry, be sure the propane tank is at least 2 feet away from the burner.

Ready, Set, Fry – Safely!!

  • Check the weather and DO NOT deep-fry in rain, sleet, snow or hail. Remember that warning about oil and water?
  • VERY IMPORTANT – Keep children and pets INDOORS. Away from the fryer. Period. Make sure the football game and cornhole tossing is on the other side of the yard so no errant objects hit the pot!
  • Do not overfill the fryer with Bacon Up. Check the manufacturer’s suggested fill level OR gauge with water by placing your thawed turkey in the pot and covering it with water. Remove the turkey and then note or mark where the water line is. This is how much bacon grease you should add to account for how much the level will rise due to displacement when the turkey is in the pot.
  • Before submerging the (completely DRY) turkey, TURN THE BURNER OFF. And, of course, you remembered to put on your gloves or oven mitts and goggles. Of course!
  • Don’t leave the fryer unattended. Hang out, and monitor the temperature of the oil throughout. You’ll want to target about 370° to start and then maintain the temperature in the 350°-360° range. If it exceeds 400° or you see smoke, turn the burner off right away to allow the temperature to decrease. If you see a flame, cover with the lid or use the fire extinguisher, depending on the size/severity of the flare-up.
  • Once the turkey has reached the desired internal temperature of 165°F – which will generally take 3 minutes per pound – then TURN THE BURNER OFF before lifting the finished turkey out of the fryer. Oil dripping onto a lit burner can ignite, and we certainly don’t want that!
  • Even after you’re done frying, someone needs to continue monitoring the pot. Never leave hot grease unattended in a back yard! The grease remains dangerously hot for a LONG time after the burner is off and a hot pot of oil should never be unattended. Never!!

So there you have it… Enjoy. Be safe. BACON UP!

Bacon Up Brussels
Recipes

Bacon Up Apple-Pecan Brussels Sprouts

Side Dish
American
Cast Iron
Bacon Up Brussels
Prep Time 15 minutes
Cook Time 25 minutes
Total Time 40 minutes

Equipment

  • Cast Iron Pan

Ingredients

  • 1 lb. Brussels sprouts (wash, remove tops and halve lengthwise)
  • 2 tbsp Bacon Up – separated
  • 1 Medium pink lady apple {or other tart/sweet crisp apple}
  • 1/2 cup Pecan halves
  • 1 tbsp Fresh rosemary
  • 1 tbsp Sage
  • Sea salt and Pepper, to taste

Instructions

  • Preheat oven to 400 degrees and line a large baking sheet with parchment paper.
  • Heat 1 T. Bacon Up in heavy skillet over medium heat. Once melted, add the Brussels Sprouts and toss to ensure they are all coated with the bacon grease.
  • Lay them out evenly on the baking sheet. To make sure they cook evenly, they should be similar in size. If any are larger than average, cut them in half again. Season to taste with sea salt and pepper, then roast for 20 minutes, until tender and slightly browned.
  • While Brussels are roasting, clean, core and chop the apple into cubes that are roughly ½ to 1 inch square.
  • When there are about 5 minutes left on the oven timer for the Brussles sprouts, add another 1 T. of Bacon Up to the skillet and heat again on medium.
  • Once the Bacon Up is melted, add the apples, rosemary and sage and sauté until the apples are softened, 3-4 minutes.
  • When the Brussels sprouts are done roasting, add them to the skillet along with the pecan halves. Toss and continue to sauté 2-3 more minutes to heat pecans and allow all the flavors to mingle.
  • Season to taste with salt and pepper and serve.
Print Recipe
Bacon Up dough
Recipes

Bacon Up Biscuits

Side Dish
American
Bread
Bacon Up dough
Prep Time 15 minutes
Total Time 25 minutes

Ingredients

  • 2 cups all-purpose flour
  • 4 tsp baking powder
  • 1/4 tsp baking soda
  • 1 tsp salt
  • 1 tsp sugar
  • 4 tbsp bacon grease (chilled or room temperature)
  • 3/4 to 1 cup cold whole buttermilk
  • 2 tbsp butter, melted for brushing (optional)

Instructions

  • Preheat oven to 450 degrees.
  • Sift the flour, baking powder, baking soda, salt, and sugar together in a large bowl. Blend the bacon grease into the flour with your hands.
  • Make a well in the center of the flour mixture, then slowly pour in part of the buttermilk and stir. Add just enough, stirring until a dough forms. STOP adding buttermilk as soon as it’s dough – even if you haven’t yet added the full ¾ to 1 cup.
  • Turn the dough out onto a floured surface. Knead, roll, and pat to shape into a slab of dough about half an inch thick. Use a biscuit cutter to cut out as many rounds as possible (recipe should make 6-8). Of course you’ll want to pull scraps together and roll into a smaller slab to cut a couple more to maximize your yield.
  • Place biscuits on a baking sheet, so that they are touching. This will provide the support they need to “climb” as they bake. (Optional: Brush tops with melted butter before baking for browner tops.)
  • Bake for 10 to 12 minutes, until the biscuits have risen and the tops have begun to brown. Serve warm.
Print Recipe


Recipes

Skillet Corn Medley with Bacon Up

Cast Iron
Prep Time 10 minutes
Cook Time 10 minutes
Total Time 20 minutes

Equipment

  • Cast Iron Pan

Ingredients

  • 4 cups fresh* or frozen corn kernels, thawed (about 6 ears of corn)
  • 1/4 cup Bacon Up
  • 2 tsp minced garlic (about two cloves)
  • 1/2 cup chopped onion (about 1/2 small onion)
  • 1 tbsp diced jalapeño (about 1 small jalapeño – no seeds or membrane) (OR, as an alternative, 2 tablespoons canned mild green chiles)
  • 1 tsp kosher salt
  • 1/4 tsp ground black pepper
  • 1 tsp cumin

Instructions

  • In a large skillet, melt Bacon Up.
  • Sauté garlic, onion, jalapeño or chiles for 3 to 4 minutes, or until the onion is translucent.
  • Add the fresh or frozen thawed corn kernels, salt, ground black pepper, and cumin.
  • Cook, stirring, for 3 minutes.
Print Recipe


Recipes

SPIRITED CHOCOLATE CHIP COOKIES – WITH BACON UP AND BOURBON

Dessert
American
Prep Time 10 minutes
Cook Time 30 minutes
Total Time 40 minutes

Ingredients

  • 2 1/2 cups Flour
  • 1 tbsp Baking soda
  • 1 tbsp Salt
  • 1/4 tbsp Baking powder
  • 1/2 cup Bacon Up
  • 1/2 cup Butter (at room temperature)
  • 3/4 cup Sugar
  • 3/4 cup Packed brown sugar
  • 3 tbsp Bourbon
  • 1 tbsp Pure vanilla extract
  • 2 Eggs
  • 10 oz. chocolate chips (dark chocolate recommended)

Optional

  • 1 lb Thick cut bacon

Instructions

  • Preheat the oven to 400°
  • [OPTIONAL: If using the bacon, bake it for 15-20 minutes on parchment-lined cookie sheet. Drain on paper towels, then crumble or dice into small pieces and set aside.]
  • Reduce oven temperature to 375°. Line two baking sheets with parchment paper.
  • Combine flour, baking soda, salt and baking powder in a medium bowl and set aside.
  • In a mixing bowl, beat on low to blend the butter, bacon fat, sugar and brown sugar.
  • Add the bourbon, vanilla, and eggs and continue beating on low until thoroughly blended.
  • Gradually add the flour mixture while on low, until completely combined.
  • Stir in the chocolate chips and crumbled bacon, if using.
  • Scoop and round a tablespoon of dough and drop onto baking sheet. Continue filling both baking sheets, placing dough balls 2 inches apart.
  • Bake 9-11 minutes, until lightly browned. Transfer to a wire rack to cool and repeat the process until the cookie dough is all baked.
  • Cookies may be kept airtight for a week or may be frozen for up to a month.
Print Recipe